how to upload images on canon image gateway with g7x
Solution
CANON iMAGE GATEWAY is a free service for Canon users.
When yous perform the settings to link the camera to Canon paradigm GATEWAY, you will be able to send images from the camera to social network services supported by Canon epitome GATEWAY (CANON prototype GATEWAY/SNS/Email) equally well as transport images to reckoner easily using the specialized software (Image Sync).
This department explains how to access Canon Image Gateway to use diverse Web services.
Please check [About Spider web service settings for Wi-Fi products] at the Catechism prototype GATEWAY top page to learn about the Spider web service settings .

Supported Web Services:
- Catechism paradigm GATEWAY Online album
- YouTube
- Flickr
- Google Bulldoze
- Irista
- Computer (Image Sync)
IMPORTANT
- For more information on Canon prototype GATEWAY system requirements and information on countries and regions where the service is available, please refer to [Assistance] on the lesser of the Canon prototype GATEWAY top page.
- Y'all must have an business relationship with Web services other than CANON iMAGE GATEWAY if you desire to use them. For further details, cheque the websites for each Web service yous want to annals.
- Split ISP connection and access point fees may be applicable.
NOTE
Canon image GATEWAY Membership Registration Sign in to Catechism iMAGE GATEWAY
If you practice not have a Canon iMAGE GATEWAY account, follow the instructions to complete member registration (free of charge).
If yous have already completed the registration procedure, delight go on to "Making Camera and Web Service Settings".
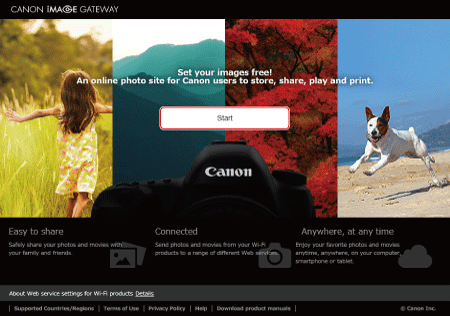
 i. Access http://canon.com/cig.
2. Click [Start].
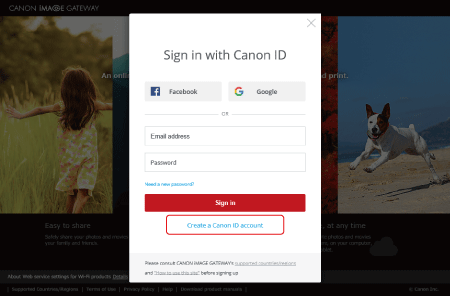
3. To sign up, click on [Create a Catechism ID account] and follow the instructions.
4. Once an business relationship has been created, follow the instructions until the page shown below is reached.
- For PC
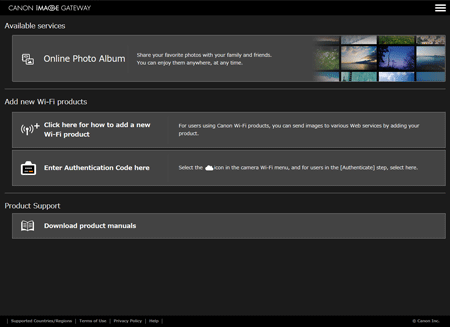
- For Smart Phones
Making Camera and Spider web Service Settings
 one. Press the playback button to turn the camera on.
- The procedure is shown on a PowerShot G7 Ten Marker 2 for the purposes of explanation. The position and shape of the operation buttons, screens displayed, and setting items may differ co-ordinate to the model you use.


- An epitome will be displayed, and the camera will be set to playback mode.
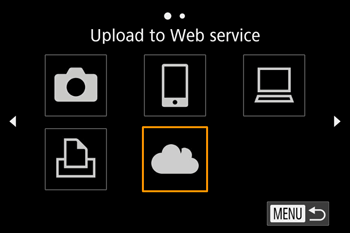
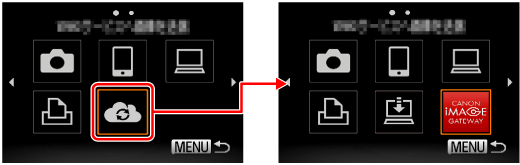
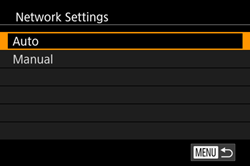
two. Press the < Wi-Fi > button (  ) to display the Wi-Fi carte.

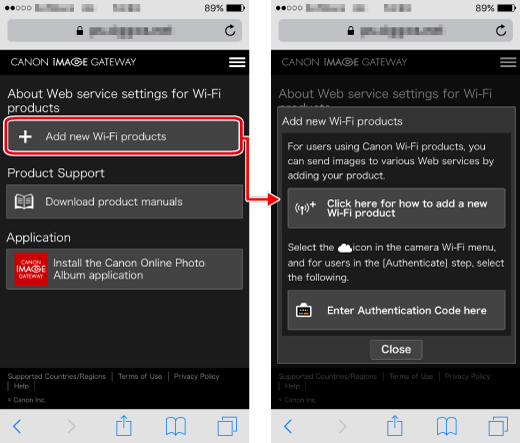
iii. Click on [Click here for how to add a new Wi-Fi product] on the page displayed for step 4 of ''Sign in to CANON iMAGE GATEWAY''.
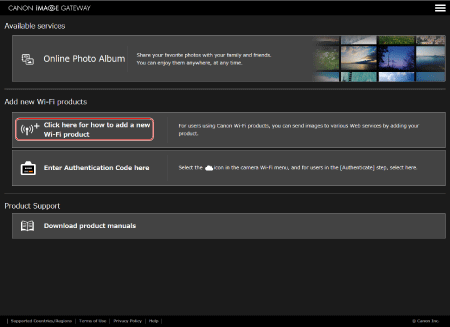
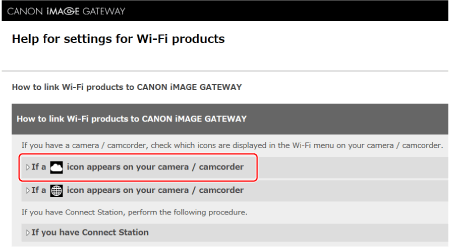
iv. Click [About Web service settings for Wi-Fi products] > [How to link Wi-Fi products to Catechism paradigm GATEWAY.] > [If a  icon appears on your photographic camera/camcorder] and follow the on-screen instructions to complete the settings.
- Settings are made with a camera connected to an admission signal (router).
5. Afterwards you have completed the settings, set [Display on product] to [ON].
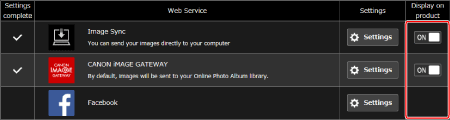
six. Touch the photographic camera's [  ] icon to refresh the screen. If the icon for the desired Web service is displayed, the setting is complete.
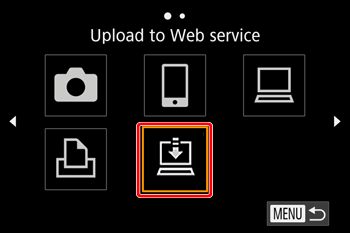
Sending Images from the Camera
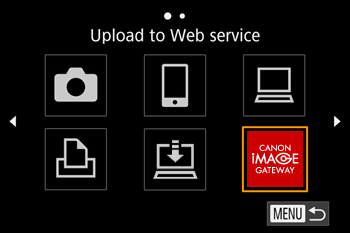
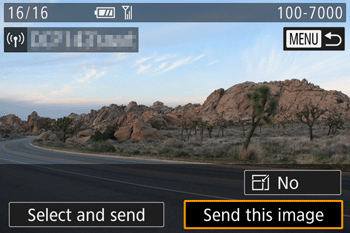
ane. Cull the icon of the desired Web service. In this example, the procedures are shown for CANON image GATEWAY.
Note
- Automatic connections will be made with access points (routers) you have previously continued to. When connecting to a new router, select the access betoken (router) name while referring to the example images below.
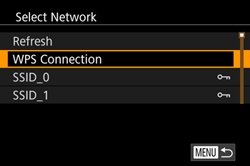
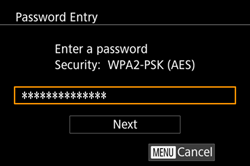
- Enter the password of the admission point (router), and then choose [Motorcar].
2. The following screen will be displayed.

3. After the connectedness has been established, the screen for sending images will appear.
NOTE
Once you have continued to devices via the Wi-Fi carte, recent destinations volition be listed kickoff when you access the bill of fare. Press the [  ] [
] [  ] buttons to access the device choice screen and and then configure the setting.
Prototype Sync Usage and Setting Procedures (Optional)
After y'all have made reckoner Prototype Sync settings, you can bear on the [  ] icon to transport all the images in the camera to the computer (transfer via server). Please use the Paradigm Transfer Utility software. Make certain y'all accept completed the Paradigm Sync settings described in "Making Camera and Web Service Settings" earlier performing the procedures below.
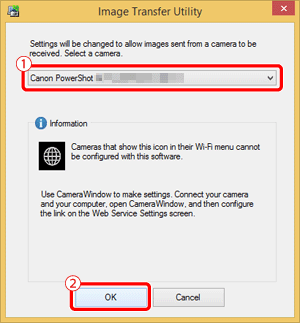
ane. Set the software.
- The Image Transfer Utility software can exist used by installing CameraWindow.

Note
The software is available for download from the Catechism website.
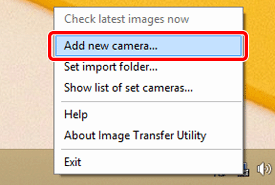
2. Windows: In the taskbar, right-click the [  ] icon and then click [Add new camera].
NOTE
Macintosh: In the card bar, double-click the [ ] icon and and then click [Add new camera].
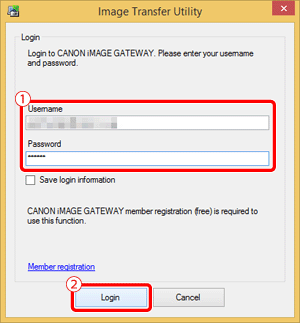
iii. Enter your [Username] and [Countersign] (  ), and click (
  ) to log-in to CANON epitome GATEWAY.
4. Select the desired photographic camera ( ), and then click [OK] ( ) to complete the settings.
5. When you select the [ ] icon on the camera, images will be sent to the computer via the server.
NOTE
- If the computer that y'all intend to transport images to is turned off, images will not be saved. Delight be careful when saving images.
- For more detailed information, please access the Catechism iMAGE GATEWAY top folio, and then click [Assistance] > [Spider web Service Settings] > [About Web service settings] > [How to use Epitome Sync and fix options].
Source: https://hk.canon/en/support/8203584200
0 Response to "how to upload images on canon image gateway with g7x"
Post a Comment